
Okay, I'll just cut right to the chase: today's scarfa is not only late, it is absent. *Ahem* I do have a moderately good reason for this, however - and, I hope, a reasonably good substitute. And hey, it's still Wednesday somewhere out there, right?
The reason for today's complete lack of scarf are twofold. The first goes back to last week when Beth won the free scarf kit in my first free giveaway. Beth picked her colours right away and I promptly wound her warp and weft. The kit is all boxed and ready for the mail... and yet, I was anxious about sending it. It turns out that Beth warps her loom from front to back, you see, and I honestly wasn't sure how well my warp chains would work from front to back. I wind an inch worth of threads at a time, which works a treat from back to front but I wasn't sure what would happen when an inch worth of threads made their way through the reed and moseyed up to the heddles - I feared that I'd send the kit off to Beth and it would turn into a tangly nightmare on her loom rather than an exciting prize. If anyone was going to be faced with a tangly nightmare on a loom, I wanted it to be me and my loom. And so I decided that I would wind Warp #8 onto the loom from front to back to make sure it works okay and to identify any potential pitfalls and solutions.
Then, since I wanted to write up instructions for warping F2B to send with the kit anyway,1 I thought it would be a peachy idea to take a lot of pictures and even some videos of the process. This would be killing two birds with one stone, I thought: I would both test the process and document it. I should mention at this point that, although I learned F2B first and warped my loom that way for 10 years, when I saw Laura Fry demonstrate her method for warping a loom2 in 2004 I never looked back. I've warped B2F almost exclusively since then - using a slightly modified version of Laura's method - so my F2B skills are Very Rusty Indeed. In retrospect it would have been a good idea to test and refine the F2B process on one warp (or even two!) before documenting the process. As it was, I documented plenty of false starts. ;)
Anyhoo, I now have one (1) warp on the loom and eighty-seven (87) photos and videos of the process I went through to get it there. You may be pleased to learn, as I was, that by far the most difficult part of the process was figuring out where the heck to put the tripod in order to take a video of threading. I confess that dealing with the camera and tripod was a bit sweary but the warp itself wound on as smoothly from front to back as it ever did from back to front. Yay! I am tres relieved!
Yea, I am also Very Tired. Ergo, I shall post a bunch of pics3 so you can see that I did at least work on a scarf today but I am not going to weave a scarf at this hour. I'll try to weave two tomorrow to make up for it. :)
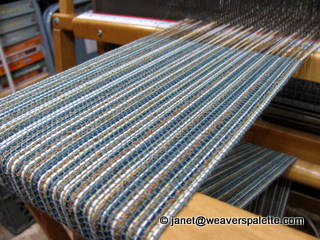
Oh, and a note about the colours in Warp #8. I'd really meant to do the blue/green/brown number I keep talking about but it's not an 8/8 warp like the one Beth chose so it wouldn't have been a good test. I really wanted to use 8/8, which meant I needed to pick some new colours. I was mulling over colours when I remembered a fabulous quilt I saw on Melody Johnson's blog, Fibermania. I ran across Fibermania last week4 and fell madly in love with Melody's hand dyed fabrics - she is all about colour, is Melody, and you know how I eat that up. Yesterday Melody posted a new quilt she'd made and I've gone back to look at it several times; I even commented on how inspiring her use of colour was... and as I remembered this it dawned on me: I could actually use the colours from her fabulous quilt and see if they make a similarly fabulous warp. :)

It's bright, like the quilt, and it makes me happy. :D I really like the warp on the loom - will be interesting to see how it weaves up with some of the other colours from the quilt in the weft.
Without futher ado, here are several of today's pics of warping the loom from front to back (in slightly smaller format than usual so that the page will load is somewhat less than 30 minutes):
All ready to weave! All I need now is eight hours' sleep and I'm all set.I've put quilter's adhesive measuring tape on my beater, measuring from the centre out. Makes it soooo much faster to know where to start sleying!
I use these white erasers all the time to keep my reeds and raddle from sliding around in the beater and in various other ways.
I usually hold the cross in my hand to sley, in which case I tie the warp to the front beam at the choke tie. This pic shows my method of tying the warp on so that it won't slip around...
...I realized, however, that I wanted to preserve my winding cross and that sleying this way would lose it, so I put lease sticks into the cross instead...
...and fastened them to the front beam with the smallest bungy cords known to man: hairbobs! I have tons of these, and use them all the time. People assume this means I have a daughter; really, I just have a barely controlled mess. ;)
The best threading hook EVAR. I also have tons of these, as I am prone to setting them down in odd places and not being able to find them again.
The threads choose their own order for sleying. :)
The first thread being sleyed. The rulers mean I never have to measure where to start.
All the threads sleyed. Imagine a clever video [here] showing how that happened
. The shafts all propped up for ease of threading. I always do this when threading B2F as it's a much better height and easier on my back. Turns out it's better just to leave them down when threading F2B. Who knew?
I [almost always] pull over a threading repeat worth of heddles at a time, and then rarely check my threading after - I am occasionally Saddened by this fact, but I know I've got the right number of heddles on the right shafts before I start, so if I happen to flub up and thread something wrong, I never have to undo more than a single repeat to sort out the heddles and always have the ones I need.
Once I was threaded, I tied the warp onto the beam as usual to provide tension while tying onto the back beam. Turns out it's a really good idea to move the lease sticks up to the beater first since they play havoc with the way the warp spreads if you leave them on the front beam. Guess how I know this?
Tying onto the back beam with surgeon's knots. Look at all that loom waste! B2F, how I miss you! I always tie the outside bouts first to support the rod.
A close up of a surgeon's knot, from a video showing how to tie them, how to tighten them up and how to loosen them again. I never use anything but surgeon's knots. (Except for when I do. Ahem.)
All tied on and ready to go!
Knots are around the beam - time to add paper. Again with the loom waste. Woe is me.
Crankin' and yankin' all at once. Constant tension, as Laura would say. Good thing I've got long arms and a loom with a narrow depth! I actually took vids of winding on this way, and of arranging the warp in a different fashion that lets you put tension on it from behind the loom where you can reach the crank more easily, and of the actual crank and yank method (i.e. without putting tension on the warp while winding). All of them worked just fine even though I'd wound in 1" bouts. O happy day!
D'oh. Forgot to take a pic of the front of the warp once it was all wound on, with the lease sticks still in. Oh well, here's me ready to chop off the end.
And now tying onto the front beam. More surgeon's knots!


So there you have it. The Cliff notes (Coles' notes, for any Canucks in the crowd) version of F2B warping. Tomorrow we'll see what some weft does with pretty quilty warp, just as soon as I get that scarf kit in the mail...
1. Not that Beth will need them, as you'll see on Friday - the scarves Beth is sharing with us for this week's guest scarf are actually pretty similar in concept, although much finer and more luscious than my simple cotton ones. Mmm Mmm Mmm!
2. If you haven't seen Laura's CD of videos and instructions titled "You Have to be Warped to Weave", you really should! (And I'm not just saying that because I played a small role in its genesis...)
3. The vids are not cooperating. :( For some reason when I chop them down to nice, short, clear snippits, Picasa goes BOOM. Very sad. Also, Google/Blogger wants me to sign some scary user agreement/release form before I can upload videos. Just doesn't seem worth it somehow. At least not at 3:00 aye em.
4. Via Sue's blog, maybe? Ravelry? A Google search of some kind? I can't remember!


6 comments:
Janet, Love the new colors. They remind me of a basket full of berries picked in all stages of ripening. So alive! You're write-up is great. One thing that I do a little differently in warping F2B is, when tying on to the back I take small groups of threads and knot the ends. Then I just loop them around the bar and around and through the group of threads. This does cut down on waste. Make sense??? Next time I warp I'll take some pics and share. Can't wait till tomorrow!! ;-D Beth
Hi Janet,
Yes, you played a crucial role in getting CDWeaver under way. Send me your mailing address and I'll send you the updated CDWIII.
Cheers,
Laura
Wow, I SO didn't mean to fish for free goodies! But hey, since you're offering and I KNOW how great the CDW cds are, I'm all over it!
I've heard of the CDW but, what is it exactly?
What I have is an early version (perhaps even a proto-version?) of "You Have to Be Warped" which is just one part of the CD Weaver ensemble. It's a set by step tutorial - part ebook, part video - of the super easy, efficient and ergonomic way that Laura warps her loom, with tons of pictures and videos demonstrating every step. There are more details on Laura's website and a review of CD Weaver I and II on WeaveZine.
The CDs are great but the method is even better - like I said, I saw Laura warp a loom this way in 2004 and, even though I was a dyed in the wool F2Ber, I immediately changed my tune and have warped this way almost exclusively since then: the only time I warp F2B now is when there's an overwhelming reason for it. I made all my students learn this method and have demonstrated it a few times for the members of my local guild - most of them acknowledge that this is a much better method of dressing a loom than whatever they learned first, but it's hard to get used to a new way of doing things when you only warp a loom occasionally and you've only seen it done a time or two. Enter the CD Weaver cds - they're like an instant, on demand demo of what to do and how to do it.
No affiliation here apart from friendship - my only connection to CD Weaver was giving Laura a little nudge in that direction. When she was here in 2004, I amused (and irritated, I dare say) her and the rest of the workshop participants by taking a ton of pics and videos of every step of her warping demo 'cause I didn't want to miss or forget a thing. I put them all on a cd for her (and for myself - still have them all!) and I think that was what gave her the idea for the CD Weaver series in the first place. Or perhaps it just cemented plans she was already formulating... we'd have to ask her to know for sure! Doesn't really matter, of course, but it does make me proud to know that I had something to do with it, whatever that something was. :)
Janet was the catalyst for getting a handle on the format for CD Weaver. :) Many people had commented to me over the years that they wished I would do a video, but I had a great reluctance (for a number of reasons) to do a flat out video presentation. When Janet showed me that she could do video clips with her camera, it all came together, and voila - the rest - as they say - is history. :D
Cheers,
Laura
Post a Comment